 The First Layer is Everything: 3 Simple Steps to a Perfect 3D Print Start
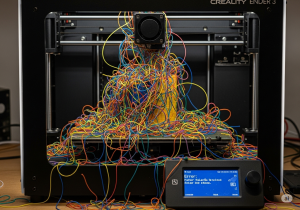
Your 3D printer is a marvel of modern technology, capable of bringing your digital creations to life, layer by layer. But as any seasoned maker will tell you, the success of your entire print hinges on one critical element: the first layer. A flawless first layer provides the stable foundation upon which your masterpiece will be built. Conversely, a poor first layer is a surefire recipe for a tangled mess of filament, otherwise known as “spaghetti.”
This guide will walk you through the three most crucial aspects of achieving that perfect first layer, transforming your printing experience from frustrating to fantastic.
1. The Art of the Level Bed: Your Foundation for Success
Think of your 3D printer’s build plate as the foundation of a house. If it’s not perfectly level, everything built on top will be skewed. In 3D printing, an unlevel bed means the nozzle will be too close to the build surface in some areas and too far in others, leading to a host of problems.
Manual vs. Automatic Bed Leveling:
- Manual Leveling: This classic method involves using a piece of paper or a feeler gauge to manually adjust the distance between the nozzle and the build plate at several points (usually the four corners and the center). The goal is to feel a slight drag on the paper at each point. While it requires a bit more effort, mastering manual leveling is a valuable skill for any 3D printing enthusiast.
- Automatic Bed Leveling (ABL): Many modern printers come equipped with ABL systems. These use a sensor to probe multiple points on the build plate and create a digital map of its surface. The printer then automatically compensates for any minor inconsistencies, ensuring a consistent nozzle height across the entire bed. If your printer has ABL, make sure it’s enabled and properly calibrated according to your manufacturer’s instructions.

The Magic of Z-Offset:
Even with a level bed, you need to fine-tune the “Z-offset.” This is the precise distance between the nozzle and the build plate when the printer starts printing the first layer.
- Too high: The filament won’t adhere properly, resulting in a print that easily detaches. You’ll see gaps between the lines of the first layer.
- Too low: The nozzle will squish the filament too much, potentially causing it to be too thin or creating “elephant’s foot” (where the base of the print bulges out). In the worst-case scenario, the nozzle can even damage your build surface.
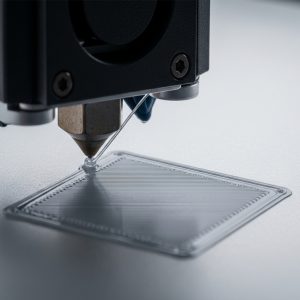
The ideal Z-offset creates a first layer with neatly “squished” lines of filament that are fused together without any gaps. You may need to make small adjustments to this setting in your printer’s firmware or slicer software to find the sweet spot for your specific filament and printer.
2. Slow and Steady Wins the Race: First Layer Speed and Temperature
Patience is a virtue, especially when it comes to the first layer. Rushing this crucial stage can lead to poor adhesion as the filament doesn’t have enough time to properly bond to the build surface.
Slicer Settings to Tweak:
- First Layer Speed: In your slicer software (like Cura, PrusaSlicer, or Simplify3D), you’ll find an option to control the print speed of the initial layer. A good rule of thumb is to set it to 50% of your normal print speed, or even slower. This gives the molten plastic ample time to stick.
- Bed Temperature: A heated build plate is essential for many filaments. The heat helps the first layer adhere and prevents warping as the plastic cools. Check your filament manufacturer’s recommended bed temperature. For PLA, this is typically around 50-60°C, while ABS and PETG require higher temperatures.
- Nozzle Temperature: The right nozzle temperature ensures the filament melts correctly and flows smoothly. Again, refer to your filament’s specifications. A slightly higher nozzle temperature for the first layer can sometimes improve adhesion, but be careful not to go too high, as this can cause other issues.
3. A Clean Slate: The Importance of a Pristine Build Surface
Dust, grease from your fingers, and leftover residue from previous prints can all act as a barrier between your filament and the build plate, preventing a strong bond.
Cleaning Your Build Surface:
- Isopropyl Alcohol (IPA): For most build surfaces like glass, PEI, and BuildTak, a wipe-down with a high-percentage isopropyl alcohol before each print is the best way to remove any contaminants.
- Soap and Water: For a deeper clean, occasionally wash your build plate with warm water and dish soap. Ensure it’s completely dry before reinstalling it.
When You Need a Little Extra Help: Adhesion Aids
Sometimes, even with a perfectly level and clean bed, certain filaments can be stubborn. This is where adhesion aids come in handy.
- Glue Stick: A thin, even layer of a standard PVA glue stick applied to the build plate can work wonders for adhesion, especially with PLA.
- Hairspray: A light mist of extra-hold hairspray can also provide a tacky surface for your print to grip.
- Specialized Adhesion Sheets: For a more permanent solution, consider applying a specialized build surface like a PEI (Polyetherimide) or BuildTak sheet. These offer excellent adhesion for a wide range of materials.
- Brims and Rafts: As a last resort, your slicer software can generate a “brim” (a single layer of extra material around the base of your print) or a “raft” (a thicker base upon which your print is built). These increase the surface area of the first layer, significantly improving adhesion for prints with small footprints or sharp corners.
By mastering these three fundamental principles – bed leveling, first layer settings, and build surface preparation – you’ll be well on your way to achieving that coveted, flawless first layer every single time. Happy printing!